快乐崇拜的技术博客

聪明出于勤奋,天才在于积累


  • 首页

  • 分类

  • 关于

  • 归档

  • 标签

  • Sitemap

  • 公益404

  • 搜索
快乐崇拜的技术博客

disruptor学习教程(一)helloWord

发表于 2016-12-13 | 分类于 高并发 |

一、什么是 Disruptor

从功能上来看,Disruptor 是实现了“队列”的功能,而且是一个有界队列。那么它的应用场景自然就是“生产者-消费者”模型的应用场合了。

可以拿 JDK 的 BlockingQueue 做一个简单对比,以便更好地认识 Disruptor 是什么。

我们知道 BlockingQueue 是一个 FIFO 队列,生产者(Producer)往队列里发布(publish)一项事件(或称之为“消息”也可以)时,消费者(Consumer)能获得通知;如果没有事件时,消费者被堵塞,直到生产者发布了新的事件。

这些都是 Disruptor 能做到的,与之不同的是,Disruptor 能做更多:

同一个“事件”可以有多个消费者,消费者之间既可以并行处理,也可以相互依赖形成处理的先后次序(形成一个依赖图);
预分配用于存储事件内容的内存空间;
针对极高的性能目标而实现的极度优化和无锁的设计;
以上的描述虽然简单地指出了 Disruptor 是什么,但对于它“能做什么”还不是那么直截了当。一般性地来说,当你需要在两个独立的处理过程(两个线程)之间交换数据时,就可以使用 Disruptor 。当然使用队列(如上面提到的 BlockingQueue)也可以,只不过 Disruptor 做得更好。

拿队列来作比较的做法弱化了对 Disruptor 有多强大的认识,如果想要对此有更多的了解,可以仔细看看 Disruptor 在其东家 LMAX 交易平台(也是实现者) 是如何作为核心架构来使用的,这方面就不做详述了,问度娘或谷哥都能找到。

二、Disruptor 的核心概念

先从了解 Disruptor 的核心概念开始,来了解它是如何运作的。下面介绍的概念模型,既是领域对象,也是映射到代码实现上的核心对象。

  • Ring Buffer
    如其名,环形的缓冲区。曾经 RingBuffer 是 Disruptor 中的最主要的对象,但从3.0版本开始,其职责被简化为仅仅负责对通过 Disruptor 进行交换的数据(事件)进行存储和更新。在一些更高级的应用场景中,Ring Buffer 可以由用户的自定义实现来完全替代。
  • Sequence Disruptor
    通过顺序递增的序号来编号管理通过其进行交换的数据(事件),对数据(事件)的处理过程总是沿着序号逐个递增处理。一个 Sequence 用于跟踪标识某个特定的事件处理者( RingBuffer/Consumer )的处理进度。虽然一个 AtomicLong 也可以用于标识进度,但定义 Sequence 来负责该问题还有另一个目的,那就是防止不同的 Sequence 之间的CPU缓存伪共享(Flase Sharing)问题。
    (注:这是 Disruptor 实现高性能的关键点之一,网上关于伪共享问题的介绍已经汗牛充栋,在此不再赘述)。
  • Sequencer
    Sequencer 是 Disruptor 的真正核心。此接口有两个实现类 SingleProducerSequencer、MultiProducerSequencer ,它们定义在生产者和消费者之间快速、正确地传递数据的并发算法。
  • Sequence Barrier
    用于保持对RingBuffer的 main published Sequence 和Consumer依赖的其它Consumer的 Sequence 的引用。 Sequence Barrier 还定义了决定 Consumer 是否还有可处理的事件的逻辑。
  • Wait Strategy
    定义 Consumer 如何进行等待下一个事件的策略。 (注:Disruptor 定义了多种不同的策略,针对不同的场景,提供了不一样的性能表现)
  • Event
    在 Disruptor 的语义中,生产者和消费者之间进行交换的数据被称为事件(Event)。它不是一个被 Disruptor 定义的特定类型,而是由 Disruptor 的使用者定义并指定。
  • EventProcessor
    EventProcessor 持有特定消费者(Consumer)的 Sequence,并提供用于调用事件处理实现的事件循环(Event Loop)。
  • EventHandler
    Disruptor 定义的事件处理接口,由用户实现,用于处理事件,是 Consumer 的真正实现。
  • Producer
    即生产者,只是泛指调用 Disruptor 发布事件的用户代码,Disruptor 没有定义特定接口或类型。

helloword小程序

参考官网的入门示例

  1. 定义事件
    事件(Event)就是通过 Disruptor 进行交换的数据类型。

    1
    2
    3
    4
    5
    6
    7
    8
    9
    10
    11
    12
    13
    public class LongEvent
    {
    private long value;
    public void set(long value)
    {
    this.value = value;
    }
    public long getValue() {
    return value;
    }
    }
  2. 定义事件工厂

事件工厂(Event Factory)定义了如何实例化前面第1步中定义的事件(Event),需要实现接口 com.lmax.disruptor.EventFactory。
Disruptor 通过 EventFactory 在 RingBuffer 中预创建 Event 的实例。
一个 Event 实例实际上被用作一个“数据槽”,发布者发布前,先从 RingBuffer 获得一个 Event 的实例,然后往 Event 实例中填充数据,之后再发布到 RingBuffer 中,之后由 Consumer 获得该 Event 实例并从中读取数据。

1
2
3
4
5
6
7
8
9
import com.lmax.disruptor.EventFactory;
public class LongEventFactory implements EventFactory<LongEvent>
{
public LongEvent newInstance()
{
return new LongEvent();
}
}
  1. 消费者–定义事件处理的具体实现
    通过实现接口 com.lmax.disruptor.EventHandler 定义事件处理的具体实现。
1
2
3
4
5
6
7
8
9
10
11
12
13
14
15
16
17
18
19
import com.lmax.disruptor.EventHandler;
public class LongEventHandler implements EventHandler<LongEvent>
{
private int index;//消费者id
public LongEventHandler(int i){
this.index = i;
}
public LongEventHandler(){}
public void onEvent(LongEvent event, long sequence, boolean endOfBatch) throws InterruptedException {
System.out.println(String.format("index=%s, sequence=%s, Event=%s endOfBatch=%s", index, sequence, event.getValue(), endOfBatch));
// Thread.sleep(100);
}
}
  1. 定义用于事件处理(消费者)的线程池

    1
    ExecutorService executor = Executors.newCachedThreadPool();
  2. 指定等待策略

Disruptor 定义了 com.lmax.disruptor.WaitStrategy 接口用于抽象 Consumer 如何等待新事件,这是策略模式的应用。
Disruptor 提供了多个 WaitStrategy 的实现,每种策略都具有不同性能和优缺点,根据实际运行环境的 CPU 的硬件特点选择恰当的策略,并配合特定的 JVM 的配置参数,能够实现不同的性能提升。
例如,BlockingWaitStrategy、SleepingWaitStrategy、YieldingWaitStrategy 等,其中,
BlockingWaitStrategy 是最低效的策略,但其对CPU的消耗最小并且在各种不同部署环境中能提供更加一致的性能表现;
SleepingWaitStrategy 的性能表现跟 BlockingWaitStrategy 差不多,对 CPU 的消耗也类似,但其对生产者线程的影响最小,适合用于异步日志类似的场景;
YieldingWaitStrategy 的性能是最好的,适合用于低延迟的系统。在要求极高性能且事件处理线数小于 CPU 逻辑核心数的场景中,推荐使用此策略;例如,CPU开启超线程的特性。

1
2
3
WaitStrategy BLOCKING_WAIT = new BlockingWaitStrategy();
WaitStrategy SLEEPING_WAIT = new SleepingWaitStrategy();
WaitStrategy YIELDING_WAIT = new YieldingWaitStrategy();
  1. 生产(发布)消息
1
2
3
4
5
6
7
8
9
10
11
12
13
14
15
16
17
18
19
20
21
22
23
24
25
26
27
28
29
30
31
32
33
import com.lmax.disruptor.RingBuffer;
import java.nio.ByteBuffer;
/**
* 生产者
* 发布事件
*/
public class LongEventProducer
{
private final RingBuffer<LongEvent> ringBuffer;
public LongEventProducer(RingBuffer<LongEvent> ringBuffer)
{
this.ringBuffer = ringBuffer;
}
public void onData(ByteBuffer bb) {
long sequence = ringBuffer.next(); // Grab the next sequence 请求下一个事件序号;
try {
LongEvent event = ringBuffer.get(sequence); // Get the entry in the Disruptor for the sequence 获取该序号对应的事件对象;
event.set(bb.getLong(0)); // Fill with data
} finally {
/*
注意,最后的 ringBuffer.publish 方法必须包含在 finally 中以确保必须得到调用;如果某个请求的 sequence 未被提交,将会堵塞后续的发布操作或者其它的 producer。
此外,Disruptor 要求 RingBuffer.publish 必须得到调用的潜台词就是,如果发生异常也一样要调用 publish ,
那么,很显然这个时候需要调用者在事件处理的实现上来判断事件携带的数据是否是正确的或者完整的,这是实现者应该要注意的事情。
*/
ringBuffer.publish(sequence);//发布事件;
}
}
}
  1. 测试的main方法:
1
2
3
4
5
6
7
8
9
10
11
12
13
14
15
16
17
18
19
20
21
22
23
24
25
26
27
28
29
30
31
32
33
34
35
36
37
38
39
40
41
42
43
44
45
46
47
48
49
50
51
52
53
54
55
56
57
58
59
60
61
62
63
64
65
66
67
68
69
70
71
72
73
74
75
76
77
import com.lmax.disruptor.YieldingWaitStrategy;
import com.lmax.disruptor.dsl.Disruptor;
import com.lmax.disruptor.RingBuffer;
import com.lmax.disruptor.dsl.ProducerType;
import java.nio.ByteBuffer;
import java.util.concurrent.CountDownLatch;
import java.util.concurrent.Executor;
import java.util.concurrent.ExecutorService;
import java.util.concurrent.Executors;
public class LongEventMain
{
public static RingBuffer<LongEvent> ringBuffer = null;
public static ExecutorService customerExecutor = null;
public static Disruptor<LongEvent> disruptor = null;
static {
// Executor that will be used to construct new threads for consumers
customerExecutor = Executors.newCachedThreadPool();
// The factory for the event
LongEventFactory factory = new LongEventFactory();
// Specify the size of the ring buffer, must be power of 2. RingBuffer 大小,必须是 2 的 N 次方;
int bufferSize = 1024;
// Construct the Disruptor.
// disruptor = new Disruptor<>(factory, bufferSize, executor);
disruptor = new Disruptor<>(factory, bufferSize,
customerExecutor, ProducerType.MULTI,
new YieldingWaitStrategy());
// Connect the handler
disruptor.handleEventsWith(new LongEventHandler(1), new LongEventHandler(2), new LongEventHandler(3));
// Start the Disruptor, starts all threads running
disruptor.start();
// Get the ring buffer from the Disruptor to be used for publishing.
ringBuffer = disruptor.getRingBuffer();
}
public static void main(String[] args) {
final CountDownLatch latch = new CountDownLatch(10);
final LongEventProducer producer = new LongEventProducer(ringBuffer);
ExecutorService executorService = Executors.newFixedThreadPool(10);
try {
for (long a = 0; a < 10; a ++){
executorService.submit(new Runnable() {
@Override
public void run() {
ByteBuffer bb = ByteBuffer.allocate(8);
for (long l = 0; l<100; l++)
{
bb.putLong(0, l);
producer.onData(bb);
}
latch.countDown();
}
});
}
latch.await();
}catch (Exception e){
e.printStackTrace();
}finally {
if(disruptor != null) disruptor.shutdown();//关闭 disruptor,方法会堵塞,直至所有的事件都得到处理;
if(customerExecutor != null) customerExecutor.shutdown();//关闭 disruptor 使用的线程池;如果需要的话,必须手动关闭, disruptor 在 shutdown 时不会自动关闭;
if(executorService != null) executorService.shutdown();//关闭 disruptor 使用的线程池;如果需要的话,必须手动关闭, disruptor 在 shutdown 时不会自动关闭;
}
}
}

性能对比

  • 参考文章isruptor性能测试报告

参考资料

  • disruptor官方文档
  • 并发编程网disruptor
快乐崇拜的技术博客

akka学习教程(三)原理分析(原创)

发表于 2016-12-08 | 分类于 akka |
快乐崇拜的技术博客

akka学习教程(一)简介(原创)

发表于 2016-12-08 | 分类于 akka |

为什么要用akka

Akka提供可扩展的实时事务处理。

Akka是一个运行时与编程模型一致的系统,为以下目标设计:

  • 垂直扩展(并发)
  • 水平扩展(远程调用)
  • 高容错

在Akka的世界里,只有一个内容需要学习和管理,具有高内聚和高一致的语义。

Akka是一种高度可扩展的软件,这不仅仅表现在性能方面,也表现在它所适用的应用的大小。Akka的核心,Akka-actor是非常小的,可以非常方便地放进你的应用中,提供你需要的异步无锁并行功能,不会有任何困扰。

你可以任意选择Akka的某些部分集成到你的应用中,也可以使用完整的包——Akka 微内核,它是一个独立的容器,可以直接部署你的Akka应用。随着CPU核数越来越多,即使你只使用一台电脑,Akka也可作为一种提供卓越性能的选择。 Akka还同时提供多种并发范型,允许用户选择正确的工具来完成工作。

使用akka带来的好处

  • AKKA提供一种Actor并发模型,其粒度比线程小很多,这意味着你可以在项目中使用大量的Actor。
  • Akka提供了一套容错机制,允许在Actor出错时进行一些恢复或者重置操作
  • AKKA不仅可以在单击上构建高并发程序,也可以在网络中构建分布式程序,并提供位置透明的Actor定位服务

Actor

actor是akka执行的基本单元,比线程更轻量级,使用akka可以忘掉线程了。事实上,线程调度已经被akka封装。

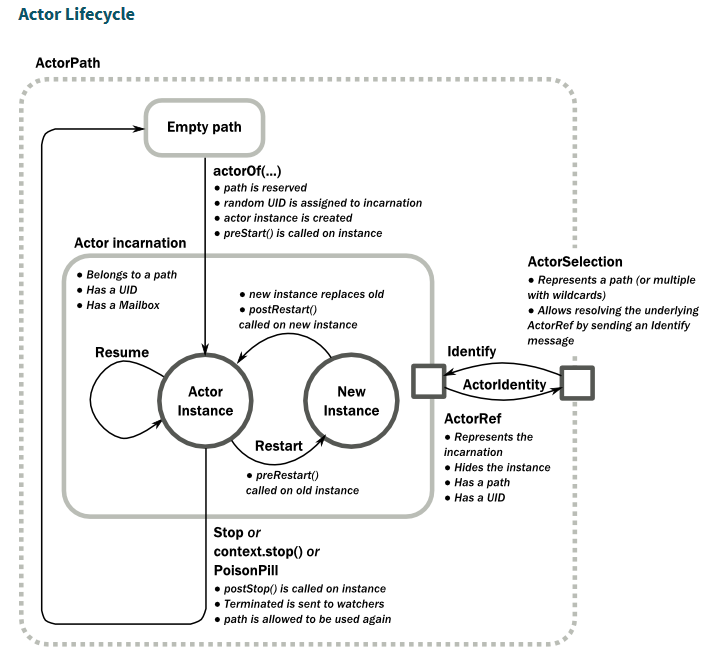
actor生命周期

##消息投递

  • 这个akka应用是有消息驱动的,消息是除了actor之外最重要的核心组件。在actor之前投递消息应该满足不可变性,也就是不便模式
  • 消息投递有3种策略:之多一次投递,至少一次投递,精确的消息投递。BUT ,没必要在akka层面保证消息的可靠性,一般在业务层在保证
  • akka可以在一定程度上保证顺序性,但不具备传递性,见《java高并发程序设计 P295》

模块

Akka的模块化做得非常好,它为不同的功能提供了不同的Jar包。

  • akka-actor-2.0.jar – 标准Actor, 有类型Actor,等等
  • akka-remote-2.0.jar – 远程Actor
  • akka-slf4j-2.0.jar – SLF4J事件处理监听器
  • akka-testkit-2.0.jar – 用于测试Actor的工具包
  • akka-kernel-2.0.jar – Akka微内核,可运行一个基本的最小应用服务器
  • akka--mailbox-2.0.jar – Akka可容错邮箱

要查看每个Akka模块的jar包依赖见 依赖 章节. 虽然不重要不过akka-actor 没有外部依赖 (除了scala-library.jar JAR包).

我该如何使用和部署 Akka?

Akka 可以有几种使用方式:

  • 作为一个库: 以普通jar包的形式放在classpath上,或放到web应用中的 WEB-INF/lib位置
  • 作为一个独立的应用程序,使用 Microkernel(微内核),自己有一个main类来初始化Actor系统
快乐崇拜的技术博客

akka学习教程(二)helloword(原创)

发表于 2016-12-08 | 分类于 akka |

本示例来自于官方示例(http://doc.akka.io/docs/akka/2.4.4/intro/getting-started.html):
文中找到 Using Akka with Maven 。点击“Akka Main in Java”下载示例。

http://www.lightbend.com/activator/template/akka-sample-main-java

注意:新版本的akka需要使用jdk8

里面有两个Actor:

1
2
3
4
5
6
7
8
9
10
11
12
13
14
15
16
17
18
19
20
21
22
23
24
25
package sample.hello;
import akka.actor.Props;
import akka.actor.UntypedActor;
import akka.actor.ActorRef;
public class HelloWorld extends UntypedActor {
  @Override
  public void preStart() {
    // create the greeter actor
    final ActorRef greeter = getContext().actorOf(Props.create(Greeter.class), "greeter");
    // tell it to perform the greeting
    greeter.tell(Greeter.Msg.GREET, getSelf());
  }
  @Override
  public void onReceive(Object msg) {
    if (msg == Greeter.Msg.DONE) {
      // when the greeter is done, stop this actor and with it the application
      getContext().stop(getSelf());
    } else
      unhandled(msg);
  }
}

1
2
3
4
5
6
7
8
9
10
11
12
13
14
15
16
17
18
19
20
21
package sample.hello;
import akka.actor.UntypedActor;
public class Greeter extends UntypedActor {
  public static enum Msg {
    GREET, DONE;
  }
  @Override
  public void onReceive(Object msg) throws InterruptedException {
    if (msg == Msg.GREET) {
      System.out.println("Hello World!");
      Thread.sleep(1000);
      getSender().tell(Msg.DONE, getSelf());
    } else
      unhandled(msg);
  }
}

main方法

1
2
3
4
5
6
7
8
package sample.hello;
public class Main {
  public static void main(String[] args) {
    akka.Main.main(new String[] { HelloWorld.class.getName() });
  }
}

另一种main写法,通过创建actor的方式

1
2
3
4
5
 public static void main(String[] args) {
    ActorSystem system = ActorSystem.create("Hello");
    ActorRef a = system.actorOf(Props.create(HelloWorld.class), "helloWorld");
    System.out.println(a.path());
  }

helloWord示例比较简单,不过多解释

快乐崇拜的技术博客

Redis学习(二)redis内存淘汰策略.md

发表于 2016-12-05 | 分类于 redis |

本文讲的是 当redis设定了最大内存之后,缓存中的数据集大小超过了一定比例,实施的淘汰策略,不是删除过期键的策略,虽然两者非常相似。

概述

在 redis 中,允许用户设置最大使用内存大小通过配置redis.conf中的maxmemory这个值来开启内存淘汰功能,在内存限定的情况下是很有用的。
设置最大内存大小可以保证redis对外提供稳健服务。

redis 内存数据集大小上升到一定大小的时候,就会施行数据淘汰策略。redis 提供 6种数据淘汰策略通过maxmemory-policy设置策略:

  1. volatile-lru:从已设置过期时间的数据集(server.db[i].expires)中挑选最近最少使用的数据淘汰
  2. volatile-ttl:从已设置过期时间的数据集(server.db[i].expires)中挑选将要过期的数据淘汰
  3. volatile-random:从已设置过期时间的数据集(server.db[i].expires)中任意选择数据淘汰
  4. allkeys-lru:从数据集(server.db[i].dict)中挑选最近最少使用的数据淘汰
  5. allkeys-random:从数据集(server.db[i].dict)中任意选择数据淘汰
  6. no-enviction(驱逐):禁止驱逐数据

redis 确定驱逐某个键值对后,会删除这个数据并将这个数据变更消息发布到本地(AOF 持久化)和从机(主从连接)

LRU 数据淘汰机制

在服务器配置中保存了 lru 计数器 server.lrulock,会定时(redis 定时程序 serverCorn())更新,server.lrulock 的值是根据 server.unixtime 计算出来的。

另外,从 struct redisObject 中可以发现,每一个 redis 对象都会设置相应的 lru。可以想象的是,每一次访问数据的时候,会更新 redisObject.lru。

LRU 数据淘汰机制是这样的:在数据集中随机挑选几个键值对,取出其中 lru 最大的键值对淘汰。所以,你会发现,redis 并不是保证取得所有数据集中最近最少使用(LRU)的键值对,而只是随机挑选的几个键值对中的。

1
2
3
4
5
6
7
8
9
10
11
12
13
14
15
16
17
18
19
20
21
22
23
24
25
26
27
28
29
30
31
32
33
34
35
36
37
38
39
40
41
42
43
44
45
46
47
48
49
50
51
52
53
// redisServer 保存了 lru 计数器
struct redisServer {
    ...
    unsigned lruclock:22;       /* Clock incrementing every minute, for LRU */
    ...
};
// 每一个 redis 对象都保存了 lru
#define REDIS_LRU_CLOCK_MAX ((1<<21)-1) /* Max value of obj->lru */
#define REDIS_LRU_CLOCK_RESOLUTION 10 /* LRU clock resolution in seconds */
typedef struct redisObject {
    // 刚刚好 32 bits
    // 对象的类型,字符串/列表/集合/哈希表
    unsigned type:4;
    // 未使用的两个位
    unsigned notused:2;     /* Not used */
    // 编码的方式,redis 为了节省空间,提供多种方式来保存一个数据
    // 譬如:“123456789” 会被存储为整数 123456789
    unsigned encoding:4;
    unsigned lru:22;        /* lru time (relative to server.lruclock) */
    // 引用数
    int refcount;
    // 数据指针
    void *ptr;
} robj;
// redis 定时执行程序。联想:linux cron
int serverCron(struct aeEventLoop *eventLoop, long long id, void *clientData) {
    ......
    /* We have just 22 bits per object for LRU information.
     * So we use an (eventually wrapping) LRU clock with 10 seconds resolution.
     * 2^22 bits with 10 seconds resolution is more or less 1.5 years.
     *
     * Note that even if this will wrap after 1.5 years it's not a problem,
     * everything will still work but just some object will appear younger
     * to Redis. But for this to happen a given object should never be touched
     * for 1.5 years.
     *
     * Note that you can change the resolution altering the
     * REDIS_LRU_CLOCK_RESOLUTION define.
     */
    updateLRUClock();
    ......
}
// 更新服务器的 lru 计数器
void updateLRUClock(void) {
    server.lruclock = (server.unixtime/REDIS_LRU_CLOCK_RESOLUTION) &
                                                REDIS_LRU_CLOCK_MAX;
}

TTL 数据淘汰机制

redis 数据集数据结构中保存了键值对过期时间的表,即 redisDb.expires。和 LRU 数据淘汰机制类似,TTL 数据淘汰机制是这样的:从过期时间的表中随机挑选几个键值对,取出其中 ttl 最大的键值对淘汰。同样你会发现,redis 并不是保证取得所有过期时间的表中最快过期的键值对,而只是随机挑选的几个键值对中的。

总结

redis 每服务客户端执行一个命令的时候,会检测使用的内存是否超额。如果超额,即进行数据淘汰。

1
2
3
4
5
6
7
8
9
10
11
12
13
14
15
16
17
18
19
20
21
22
23
24
25
26
27
28
29
30
31
32
33
34
35
36
37
38
39
40
41
42
43
44
45
46
47
48
49
50
51
52
53
54
55
56
57
58
59
60
61
62
63
64
65
66
67
68
69
70
71
72
73
74
75
76
77
78
79
80
81
82
83
84
85
86
87
88
89
90
91
92
93
94
95
96
97
98
99
100
101
102
103
104
105
106
107
108
109
110
111
112
113
114
115
116
117
118
119
120
121
122
123
124
125
126
127
128
129
130
131
132
133
134
135
136
137
138
139
140
141
142
143
144
145
146
147
148
149
150
151
152
153
154
155
156
157
158
159
160
161
162
163
164
165
166
167
168
169
170
171
172
173
174
175
176
177
178
179
180
181
182
183
184
185
186
187
188
189
190
191
192
193
194
195
196
197
198
199
200
201
202
203
204
205
206
207
208
209
// 执行命令
int processCommand(redisClient *c) {
    ......
    // 内存超额
    /* Handle the maxmemory directive.
     *
     * First we try to free some memory if possible (if there are volatile
     * keys in the dataset). If there are not the only thing we can do
     * is returning an error. */
    if (server.maxmemory) {
        int retval = freeMemoryIfNeeded();
        if ((c->cmd->flags & REDIS_CMD_DENYOOM) && retval == REDIS_ERR) {
            flagTransaction(c);
            addReply(c, shared.oomerr);
            return REDIS_OK;
        }
    }
    ......
}
// 如果需要,是否一些内存
int freeMemoryIfNeeded(void) {
    size_t mem_used, mem_tofree, mem_freed;
    int slaves = listLength(server.slaves);
    // redis 从机回复空间和 AOF 内存大小不计算入 redis 内存大小
    /* Remove the size of slaves output buffers and AOF buffer from the
     * count of used memory. */
    mem_used = zmalloc_used_memory();
    // 从机回复空间大小
    if (slaves) {
        listIter li;
        listNode *ln;
        listRewind(server.slaves,&li);
        while((ln = listNext(&li))) {
            redisClient *slave = listNodeValue(ln);
            unsigned long obuf_bytes = getClientOutputBufferMemoryUsage(slave);
            if (obuf_bytes > mem_used)
                mem_used = 0;
            else
                mem_used -= obuf_bytes;
        }
    }
    // server.aof_buf && server.aof_rewrite_buf_blocks
    if (server.aof_state != REDIS_AOF_OFF) {
        mem_used -= sdslen(server.aof_buf);
        mem_used -= aofRewriteBufferSize();
    }
    // 内存是否超过设置大小
    /* Check if we are over the memory limit. */
    if (mem_used <= server.maxmemory) return REDIS_OK;
    // redis 中可以设置内存超额策略
    if (server.maxmemory_policy == REDIS_MAXMEMORY_NO_EVICTION)
        return REDIS_ERR; /* We need to free memory, but policy forbids. */
    /* Compute how much memory we need to free. */
    mem_tofree = mem_used - server.maxmemory;
    mem_freed = 0;
    while (mem_freed < mem_tofree) {
        int j, k, keys_freed = 0;
        // 遍历所有数据集
        for (j = 0; j < server.dbnum; j++) {
            long bestval = 0; /* just to prevent warning */
            sds bestkey = NULL;
            struct dictEntry *de;
            redisDb *db = server.db+j;
            dict *dict;
            // 不同的策略,选择的数据集不一样
            if (server.maxmemory_policy == REDIS_MAXMEMORY_ALLKEYS_LRU ||
                server.maxmemory_policy == REDIS_MAXMEMORY_ALLKEYS_RANDOM)
            {
                dict = server.db[j].dict;
            } else {
                dict = server.db[j].expires;
            }
            // 数据集为空,继续下一个数据集
            if (dictSize(dict) == 0) continue;
            // 随机淘汰随机策略:随机挑选
            /* volatile-random and allkeys-random policy */
            if (server.maxmemory_policy == REDIS_MAXMEMORY_ALLKEYS_RANDOM ||
                server.maxmemory_policy == REDIS_MAXMEMORY_VOLATILE_RANDOM)
            {
                de = dictGetRandomKey(dict);
                bestkey = dictGetKey(de);
            }
            // LRU 策略:挑选最近最少使用的数据
            /* volatile-lru and allkeys-lru policy */
            else if (server.maxmemory_policy == REDIS_MAXMEMORY_ALLKEYS_LRU ||
                server.maxmemory_policy == REDIS_MAXMEMORY_VOLATILE_LRU)
            {
                // server.maxmemory_samples 为随机挑选键值对次数
                // 随机挑选 server.maxmemory_samples个键值对,驱逐最近最少使用的数据
                for (k = 0; k < server.maxmemory_samples; k++) {
                    sds thiskey;
                    long thisval;
                    robj *o;
                    // 随机挑选键值对
                    de = dictGetRandomKey(dict);
                    // 获取键
                    thiskey = dictGetKey(de);
                    /* When policy is volatile-lru we need an additional lookup
                     * to locate the real key, as dict is set to db->expires. */
                    if (server.maxmemory_policy == REDIS_MAXMEMORY_VOLATILE_LRU)
                        de = dictFind(db->dict, thiskey);
                    o = dictGetVal(de);
                    // 计算数据的空闲时间
                    thisval = estimateObjectIdleTime(o);
                    // 当前键值空闲时间更长,则记录
                    /* Higher idle time is better candidate for deletion */
                    if (bestkey == NULL || thisval > bestval) {
                        bestkey = thiskey;
                        bestval = thisval;
                    }
                }
            }
            // TTL 策略:挑选将要过期的数据
            /* volatile-ttl */
            else if (server.maxmemory_policy == REDIS_MAXMEMORY_VOLATILE_TTL) {
                // server.maxmemory_samples 为随机挑选键值对次数
                // 随机挑选 server.maxmemory_samples个键值对,驱逐最快要过期的数据
                for (k = 0; k < server.maxmemory_samples; k++) {
                    sds thiskey;
                    long thisval;
                    de = dictGetRandomKey(dict);
                    thiskey = dictGetKey(de);
                    thisval = (long) dictGetVal(de);
                    /* Expire sooner (minor expire unix timestamp) is better
                     * candidate for deletion */
                    if (bestkey == NULL || thisval < bestval) {
                        bestkey = thiskey;
                        bestval = thisval;
                    }
                }
            }
            // 删除选定的键值对
            /* Finally remove the selected key. */
            if (bestkey) {
                long long delta;
                robj *keyobj = createStringObject(bestkey,sdslen(bestkey));
                // 发布数据更新消息,主要是 AOF 持久化和从机
                propagateExpire(db,keyobj);
                // 注意, propagateExpire() 可能会导致内存的分配, propagateExpire()
提前执行就是因为 redis 只计算 dbDelete() 释放的内存大小。倘若同时计算 dbDelete() 释放的内存
和 propagateExpire() 分配空间的大小,与此同时假设分配空间大于释放空间,就有可能永远退不出这个循环。
                // 下面的代码会同时计算 dbDelete() 释放的内存和 propagateExpire() 分配空间的大小:
                // propagateExpire(db,keyobj);
                // delta = (long long) zmalloc_used_memory();
                // dbDelete(db,keyobj);
                // delta -= (long long) zmalloc_used_memory();
                // mem_freed += delta;
                /////////////////////////////////////////
                /* We compute the amount of memory freed by dbDelete() alone.
                 * It is possible that actually the memory needed to propagate
                 * the DEL in AOF and replication link is greater than the one
                 * we are freeing removing the key, but we can't account for
                 * that otherwise we would never exit the loop.
                 *
                 * AOF and Output buffer memory will be freed eventually so
                 * we only care about memory used by the key space. */
                // 只计算 dbDelete() 释放内存的大小
                delta = (long long) zmalloc_used_memory();
                dbDelete(db,keyobj);
                delta -= (long long) zmalloc_used_memory();
                mem_freed += delta;
                server.stat_evictedkeys++;
                // 将数据的删除通知所有的订阅客户端
                notifyKeyspaceEvent(REDIS_NOTIFY_EVICTED, "evicted",
                    keyobj, db->id);
                decrRefCount(keyobj);
                keys_freed++;
                // 将从机回复空间中的数据及时发送给从机
                /* When the memory to free starts to be big enough, we may
                 * start spending so much time here that is impossible to
                 * deliver data to the slaves fast enough, so we force the
                 * transmission here inside the loop. */
                if (slaves) flushSlavesOutputBuffers();
            }
        }
        // 未能释放空间,且此时 redis 使用的内存大小依旧超额,失败返回
        if (!keys_freed) return REDIS_ERR; /* nothing to free... */
    }
    return REDIS_OK;
}

适用场景

下面看看几种策略的适用场景:

  • allkeys-lru: 如果我们的应用对缓存的访问符合幂律分布(也就是存在相对热点数据),或者我们不太清楚我们应用的缓存访问分布状况,我们可以选择allkeys-lru策略。
  • allkeys-random: 如果我们的应用对于缓存key的访问概率相等,则可以使用这个策略。
  • volatile-ttl: 这种策略使得我们可以向Redis提示哪些key更适合被eviction。

另外,volatile-lru策略和volatile-random策略适合我们将一个Redis实例既应用于缓存和又应用于持久化存储的时候,然而我们也可以通过使用两个Redis实例来达到相同的效果,值得一提的是将key设置过期时间实际上会消耗更多的内存,因此我们建议使用allkeys-lru策略从而更有效率的使用内存。

快乐崇拜的技术博客

Redis学习(一)redis3.2.5集群搭建.md

发表于 2016-12-05 | 分类于 redis |

下载和解包

1
2
3
cd /usr/software
wget http://download.redis.io/releases/redis-3.2.6.tar.gz
tar -zxvf /redis-3.2.6.tar.gz

编译安装

1
2
cd redis-3.2.6
make && make install

创建redis节点

测试我们选择2台服务器,分别为:192.168.215.129,192.168.215.130.每分服务器有3个节点。

  • 我先在192.168.215.129创建3个节点:
1
2
3
4
5
6
7
8
9
10
11
cd /usr/software
mkdir redis_cluster //创建集群目录
cd redis_cluster
mkdir 7000 7001 7002  //分别代表三个节点    其对应端口 7000 7001 7002
cd ..
 //创建7000节点为例,拷贝到7000目录
 cp /usr/software/redis-3.2.6/redis.conf  ./redis_cluster/7000/
 //拷贝到7001目录
 cp /usr/software/redis-3.2.6/redis.conf  ./redis_cluster/7001/
 //拷贝到7002目录
 cp /usr/software/redis-3.2.6/redis.conf  ./redis_cluster/7002/

分别对7000,7001、7002文件夹中的3个文件修改对应的配置

1
2
3
4
5
6
7
8
daemonize    yes                          //redis后台运行
pidfile  /var/run/redis_7000.pid          //pidfile文件对应7000,7001,7002
port  7000                                //端口7000,7002,7003
cluster-enabled  yes                      //开启集群  把注释#去掉
cluster-config-file  nodes_7000.conf      //集群的配置  配置文件首次启动自动生成 7000,7001,7002
bind 192.168.215.130                      //这里要绑定机器的IP
cluster-node-timeout  5000                //请求超时  设置5秒够了
appendonly  yes                           //aof日志开启  有需要就开启,它会每次写操作都记录一条日志</pre>
  • 在192.168.1.238创建3个节点:对应的端口改为7003,7004,7005.配置对应的改一下就可以了。

    4、两台机启动各节点(两台服务器方式一样)

    1
    2
    3
    4
    5
    6
    7
    cd /usr/software
    redis-server  redis_cluster/7000/redis.conf
    redis-server  redis_cluster/7001/redis.conf
    redis-server  redis_cluster/7002/redis.conf
    redis-server  redis_cluster/7003/redis.conf
    redis-server  redis_cluster/7004/redis.conf
    redis-server  redis_cluster/7005/redis.conf

查看服务

1
2
ps -ef | grep redis   #查看是否启动成功
netstat -tnlp | grep redis #可以看到redis监听端口
1
2
3
4
5
6
7
8
9
10
11
12
13
14
15
[root@zk1 software]# ps -ef | grep redis
root      10601      1  0 06:42 ?        00:00:00 redis-server 192.168.215.129:7000 [cluster]
root      10606      1  0 06:42 ?        00:00:00 redis-server 192.168.215.129:7001 [cluster]
root      10610      1  0 06:42 ?        00:00:00 redis-server 192.168.215.129:7002 [cluster]
root      10615   4548  0 06:42 pts/2    00:00:00 grep --color=auto redis
[root@zk1 software]# 
[root@zk1 software]# 
[root@zk1 software]# 
[root@zk1 software]# netstat -tnlp | grep redis
tcp        0      0 192.168.215.129:17002   0.0.0.0:*               LISTEN      10610/redis-server  
tcp        0      0 192.168.215.129:7000    0.0.0.0:*               LISTEN      10601/redis-server  
tcp        0      0 192.168.215.129:7001    0.0.0.0:*               LISTEN      10606/redis-server  
tcp        0      0 192.168.215.129:7002    0.0.0.0:*               LISTEN      10610/redis-server  
tcp        0      0 192.168.215.129:17000   0.0.0.0:*               LISTEN      10601/redis-server  
tcp        0      0 192.168.215.129:17001   0.0.0.0:*               LISTEN      10606/redis-server

创建集群

前面已经准备好了搭建集群的redis节点,接下来我们要把这些节点都串连起来搭建集群。官方提供了一个工具:redis-trib.rb(/usr/local/redis-3.2.1/src/redis-trib.rb) 看后缀就知道这鸟东西不能直接执行,它是用ruby写的一个程序,所以我们还得安装ruby.再用 gem 这个命令来安装 redis接口, gem是ruby的一个工具包.
为了方便,两台机器都安装.

1
2
yum -y install ruby ruby-devel rubygems rpm-build
gem install redis

注意:这里需要修改gem源,并且淘宝的gem源已经不能用了,坑爹啊,现在要使用ruby-china。
https://gems.ruby-china.org/

添加ruby-china源:

1
2
3
4
5
[root@zk1 software]# gem sources --add https://gems.ruby-china.org/ --remove https://rubygems.org/
[root@zk1 software]# gem sources -l
*** CURRENT SOURCES ***
https://gems.ruby-china.org/

  • redis-trib.rb
    进入/usr/software/redis-3.2.5/src运行一下redis-trib.rb
    1
    2
    3
    4
    5
    6
    7
    8
    9
    10
    11
    12
    13
    14
    15
    16
    17
    18
    19
    20
    21
    22
    23
    24
    25
    26
    27
    28
    29
    30
    31
    32
    33
    34
    35
    36
    37
    [root@zk2 src]# ./redis-trib.rb
    Usage: redis-trib <command> <options> <arguments ...>
      create          host1:port1 ... hostN:portN
                      --replicas <arg>
      check           host:port
      info            host:port
      fix             host:port
                      --timeout <arg>
      reshard         host:port
                      --from <arg>
                      --to <arg>
                      --slots <arg>
                      --yes
                      --timeout <arg>
                      --pipeline <arg>
      rebalance       host:port
                      --weight <arg>
                      --auto-weights
                      --use-empty-masters
                      --timeout <arg>
                      --simulate
                      --pipeline <arg>
                      --threshold <arg>
      add-node        new_host:new_port existing_host:existing_port
                      --slave
                      --master-id <arg>
      del-node        host:port node_id
      set-timeout     host:port milliseconds
      call            host:port command arg arg .. arg
      import          host:port
                      --from <arg>
                      --copy
                      --replace
      help            (show this help)
    For check, fix, reshard, del-node, set-timeout you can specify the host and port of any working node in the cluster.

看到这,应该明白了吧, 就是靠上面这些操作 完成redis集群搭建的.

确认所有的节点都启动,接下来使用参数create 创建 (在192.168.215.129中来创建)注意要关闭防火墙

1
2
3
4
5
6
7
8
9
10
11
12
13
14
15
16
17
18
19
20
21
22
23
24
25
26
27
28
29
30
31
32
33
34
35
36
37
38
39
40
41
42
43
44
45
46
47
48
49
50
[root@zk1 src]# ./redis-trib.rb  create  --replicas  1  192.168.215.129:7000 192.168.215.129:7001  192.168.215.129:7002 192.168.215.130:7003  192.168.215.130:7004  192.168.215.130:7005
>>> Creating cluster
>>> Performing hash slots allocation on 6 nodes...
Using 3 masters:
192.168.215.129:7000
192.168.215.130:7003
192.168.215.129:7001
Adding replica 192.168.215.130:7004 to 192.168.215.129:7000
Adding replica 192.168.215.129:7002 to 192.168.215.130:7003
Adding replica 192.168.215.130:7005 to 192.168.215.129:7001
M: 16518afbfcbd961aeb76ef1592007a3e7fe24b1b 192.168.215.129:7000
   slots:0-5460 (5461 slots) master
M: 524219969118a57ceaac753ecef7585f634cdf26 192.168.215.129:7001
   slots:10923-16383 (5461 slots) master
S: ea4519ff0083a13cef8262490ee9e61e5a4b14b1 192.168.215.129:7002
   replicates 82c0e591b9bc7a289026dff2873a254d1c49d285
M: 82c0e591b9bc7a289026dff2873a254d1c49d285 192.168.215.130:7003
   slots:5461-10922 (5462 slots) master
S: baf74dd89c0605d2a71a8d1d3706005ff668563b 192.168.215.130:7004
   replicates 16518afbfcbd961aeb76ef1592007a3e7fe24b1b
S: f8192314d2232e12ba9f558e9ecbfcc890f4fb73 192.168.215.130:7005
   replicates 524219969118a57ceaac753ecef7585f634cdf26
Can I set the above configuration? (type 'yes' to accept): yes
>>> Nodes configuration updated
>>> Assign a different config epoch to each node
>>> Sending CLUSTER MEET messages to join the cluster
Waiting for the cluster to join.....
>>> Performing Cluster Check (using node 192.168.215.129:7000)
M: 16518afbfcbd961aeb76ef1592007a3e7fe24b1b 192.168.215.129:7000
   slots:0-5460 (5461 slots) master
   1 additional replica(s)
S: ea4519ff0083a13cef8262490ee9e61e5a4b14b1 192.168.215.129:7002
   slots: (0 slots) slave
   replicates 82c0e591b9bc7a289026dff2873a254d1c49d285
S: f8192314d2232e12ba9f558e9ecbfcc890f4fb73 192.168.215.130:7005
   slots: (0 slots) slave
   replicates 524219969118a57ceaac753ecef7585f634cdf26
S: baf74dd89c0605d2a71a8d1d3706005ff668563b 192.168.215.130:7004
   slots: (0 slots) slave
   replicates 16518afbfcbd961aeb76ef1592007a3e7fe24b1b
M: 524219969118a57ceaac753ecef7585f634cdf26 192.168.215.129:7001
   slots:10923-16383 (5461 slots) master
   1 additional replica(s)
M: 82c0e591b9bc7a289026dff2873a254d1c49d285 192.168.215.130:7003
   slots:5461-10922 (5462 slots) master
   1 additional replica(s)
[OK] All nodes agree about slots configuration.
>>> Check for open slots...
>>> Check slots coverage...
[OK] All 16384 slots covered.

解释下, –replicas 1 表示 自动为每一个master节点分配一个slave节点 上面有6个节点,程序会按照一定规则生成 3个master(主)3个slave(从)
前面已经提醒过的 防火墙一定要开放监听的端口,否则会创建失败。

检查集群状态:

1
2
3
4
5
6
7
8
9
10
11
12
13
14
15
16
17
18
19
20
21
22
23
24
[root@zk1 src]# ./redis-trib.rb check 192.168.215.129:7002
>>> Performing Cluster Check (using node 192.168.215.129:7002)
S: ea4519ff0083a13cef8262490ee9e61e5a4b14b1 192.168.215.129:7002
   slots: (0 slots) slave
   replicates 82c0e591b9bc7a289026dff2873a254d1c49d285
M: 82c0e591b9bc7a289026dff2873a254d1c49d285 192.168.215.130:7003
   slots:5461-10922 (5462 slots) master
   1 additional replica(s)
S: baf74dd89c0605d2a71a8d1d3706005ff668563b 192.168.215.130:7004
   slots: (0 slots) slave
   replicates 16518afbfcbd961aeb76ef1592007a3e7fe24b1b
M: 524219969118a57ceaac753ecef7585f634cdf26 192.168.215.129:7001
   slots:10923-16383 (5461 slots) master
   1 additional replica(s)
M: 16518afbfcbd961aeb76ef1592007a3e7fe24b1b 192.168.215.129:7000
   slots:0-5460 (5461 slots) master
   1 additional replica(s)
S: f8192314d2232e12ba9f558e9ecbfcc890f4fb73 192.168.215.130:7005
   slots: (0 slots) slave
   replicates 524219969118a57ceaac753ecef7585f634cdf26
[OK] All nodes agree about slots configuration.
>>> Check for open slots...
>>> Check slots coverage...
[OK] All 16384 slots covered.

redis集群中数据分片是通过hash slot的方式实现的

测试集群

  • 链接服务器
1
2
3
4
5
6
7
8
9
10
11
12
13
14
[root@zk1 src]# ./redis-cli -c -p 7000 -h 192.168.215.129
192.168.215.129:7000>
192.168.215.129:7000> cluster info
cluster_state:ok
cluster_slots_assigned:16384
cluster_slots_ok:16384
cluster_slots_pfail:0
cluster_slots_fail:0
cluster_known_nodes:6
cluster_size:3
cluster_current_epoch:6
cluster_my_epoch:1
cluster_stats_messages_sent:1502
cluster_stats_messages_received:1502
  • set值
    1
    2
    3
    4
    5
    192.168.215.129:7000> set name lbl
    -> Redirected to slot [5798] located at 192.168.215.130:7003
    OK
    192.168.215.130:7003> get name
    "lbl"

可见,重定向到了130节点7003端口。
原因是redis采用hash槽的方式分发key到不同节点,算法是crc(16)%16384。详细描述后续会单独写文章描述。
而且你会发现,当一次重定向以后,这个客户端就连接到了130:7003这个节点。

测试其中一个master宕机

将上面设置的name所在的130:7003kill掉,只剩了两个master和3个slave。你会发现cluster_current_epoch相比之前加了1,这是因为redis的主从关系,重新选了一次主。
然后get name发现,重定向了129:7002这个节点。

1
2
3
4
5
6
7
8
9
10
11
12
13
14
15
16
17
18
19
20
21
22
23
24
25
26
27
28
29
30
31
32
33
34
35
36
37
38
[root@zk1 src]# ./redis-trib.rb check 192.168.215.129:7002
>>> Performing Cluster Check (using node 192.168.215.129:7002)
M: ea4519ff0083a13cef8262490ee9e61e5a4b14b1 192.168.215.129:7002
   slots:5461-10922 (5462 slots) master
   0 additional replica(s)
S: baf74dd89c0605d2a71a8d1d3706005ff668563b 192.168.215.130:7004
   slots: (0 slots) slave
   replicates 16518afbfcbd961aeb76ef1592007a3e7fe24b1b
M: 524219969118a57ceaac753ecef7585f634cdf26 192.168.215.129:7001
   slots:10923-16383 (5461 slots) master
   1 additional replica(s)
M: 16518afbfcbd961aeb76ef1592007a3e7fe24b1b 192.168.215.129:7000
   slots:0-5460 (5461 slots) master
   1 additional replica(s)
S: f8192314d2232e12ba9f558e9ecbfcc890f4fb73 192.168.215.130:7005
   slots: (0 slots) slave
   replicates 524219969118a57ceaac753ecef7585f634cdf26
[OK] All nodes agree about slots configuration.
>>> Check for open slots...
>>> Check slots coverage...
[OK] All 16384 slots covered.
[root@zk1 src]# ./redis-cli -c -p 7000 -h 192.168.215.129
192.168.215.129:7000> cluster info
cluster_state:ok
cluster_slots_assigned:16384
cluster_slots_ok:16384
cluster_slots_pfail:0
cluster_slots_fail:0
cluster_known_nodes:6
cluster_size:3
cluster_current_epoch:7
cluster_my_epoch:1
cluster_stats_messages_sent:2883
cluster_stats_messages_received:2675
192.168.215.129:7000> get name
-> Redirected to slot [5798] located at 192.168.215.129:7002
"lbl"

之所以会重定向到129:7002这个节点,是因为在kill之前129:7002是130:7003的slave:
下面这是在kill之前拷贝的./redis-trib.rb check的数据,注意replicates后的值

1
2
3
4
1.  `S: ea4519ff0083a13cef8262490ee9e61e5a4b14b1 192.168.215.129:7002`
2.  `replicates 82c0e591b9bc7a289026dff2873a254d1c49d285`
3.  `M:  82c0e591b9bc7a289026dff2873a254d1c49d285  192.168.215.130:7003`
4.  `slots:5461-10922  (5462 slots) master`

好了,今天就到这里,redis具体实现原理后续再讲。

快乐崇拜的技术博客

Redis学习(二)redis内存淘汰策略.md

发表于 2016-12-05 | 分类于 redis |

本文讲的是 当redis设定了最大内存之后,缓存中的数据集大小超过了一定比例,实施的淘汰策略,不是删除过期键的策略,虽然两者非常相似。

概述

在 redis 中,允许用户设置最大使用内存大小通过配置redis.conf中的maxmemory这个值来开启内存淘汰功能,在内存限定的情况下是很有用的。
设置最大内存大小可以保证redis对外提供稳健服务。

redis 内存数据集大小上升到一定大小的时候,就会施行数据淘汰策略。redis 提供 6种数据淘汰策略通过maxmemory-policy设置策略:

  1. volatile-lru:从已设置过期时间的数据集(server.db[i].expires)中挑选最近最少使用的数据淘汰
  2. volatile-ttl:从已设置过期时间的数据集(server.db[i].expires)中挑选将要过期的数据淘汰
  3. volatile-random:从已设置过期时间的数据集(server.db[i].expires)中任意选择数据淘汰
  4. allkeys-lru:从数据集(server.db[i].dict)中挑选最近最少使用的数据淘汰
  5. allkeys-random:从数据集(server.db[i].dict)中任意选择数据淘汰
  6. no-enviction(驱逐):禁止驱逐数据

redis 确定驱逐某个键值对后,会删除这个数据并将这个数据变更消息发布到本地(AOF 持久化)和从机(主从连接)

LRU 数据淘汰机制

在服务器配置中保存了 lru 计数器 server.lrulock,会定时(redis 定时程序 serverCorn())更新,server.lrulock 的值是根据 server.unixtime 计算出来的。

另外,从 struct redisObject 中可以发现,每一个 redis 对象都会设置相应的 lru。可以想象的是,每一次访问数据的时候,会更新 redisObject.lru。

LRU 数据淘汰机制是这样的:在数据集中随机挑选几个键值对,取出其中 lru 最大的键值对淘汰。所以,你会发现,redis 并不是保证取得所有数据集中最近最少使用(LRU)的键值对,而只是随机挑选的几个键值对中的。

1
2
3
4
5
6
7
8
9
10
11
12
13
14
15
16
17
18
19
20
21
22
23
24
25
26
27
28
29
30
31
32
33
34
35
36
37
38
39
40
41
42
43
44
45
46
47
48
49
50
51
52
53
// redisServer 保存了 lru 计数器
struct redisServer {
    ...
    unsigned lruclock:22;       /* Clock incrementing every minute, for LRU */
    ...
};
// 每一个 redis 对象都保存了 lru
#define REDIS_LRU_CLOCK_MAX ((1<<21)-1) /* Max value of obj->lru */
#define REDIS_LRU_CLOCK_RESOLUTION 10 /* LRU clock resolution in seconds */
typedef struct redisObject {
    // 刚刚好 32 bits
    // 对象的类型,字符串/列表/集合/哈希表
    unsigned type:4;
    // 未使用的两个位
    unsigned notused:2;     /* Not used */
    // 编码的方式,redis 为了节省空间,提供多种方式来保存一个数据
    // 譬如:“123456789” 会被存储为整数 123456789
    unsigned encoding:4;
    unsigned lru:22;        /* lru time (relative to server.lruclock) */
    // 引用数
    int refcount;
    // 数据指针
    void *ptr;
} robj;
// redis 定时执行程序。联想:linux cron
int serverCron(struct aeEventLoop *eventLoop, long long id, void *clientData) {
    ......
    /* We have just 22 bits per object for LRU information.
     * So we use an (eventually wrapping) LRU clock with 10 seconds resolution.
     * 2^22 bits with 10 seconds resolution is more or less 1.5 years.
     *
     * Note that even if this will wrap after 1.5 years it's not a problem,
     * everything will still work but just some object will appear younger
     * to Redis. But for this to happen a given object should never be touched
     * for 1.5 years.
     *
     * Note that you can change the resolution altering the
     * REDIS_LRU_CLOCK_RESOLUTION define.
     */
    updateLRUClock();
    ......
}
// 更新服务器的 lru 计数器
void updateLRUClock(void) {
    server.lruclock = (server.unixtime/REDIS_LRU_CLOCK_RESOLUTION) &
                                                REDIS_LRU_CLOCK_MAX;
}

TTL 数据淘汰机制

redis 数据集数据结构中保存了键值对过期时间的表,即 redisDb.expires。和 LRU 数据淘汰机制类似,TTL 数据淘汰机制是这样的:从过期时间的表中随机挑选几个键值对,取出其中 ttl 最大的键值对淘汰。同样你会发现,redis 并不是保证取得所有过期时间的表中最快过期的键值对,而只是随机挑选的几个键值对中的。

总结

redis 每服务客户端执行一个命令的时候,会检测使用的内存是否超额。如果超额,即进行数据淘汰。

1
2
3
4
5
6
7
8
9
10
11
12
13
14
15
16
17
18
19
20
21
22
23
24
25
26
27
28
29
30
31
32
33
34
35
36
37
38
39
40
41
42
43
44
45
46
47
48
49
50
51
52
53
54
55
56
57
58
59
60
61
62
63
64
65
66
67
68
69
70
71
72
73
74
75
76
77
78
79
80
81
82
83
84
85
86
87
88
89
90
91
92
93
94
95
96
97
98
99
100
101
102
103
104
105
106
107
108
109
110
111
112
113
114
115
116
117
118
119
120
121
122
123
124
125
126
127
128
129
130
131
132
133
134
135
136
137
138
139
140
141
142
143
144
145
146
147
148
149
150
151
152
153
154
155
156
157
158
159
160
161
162
163
164
165
166
167
168
169
170
171
172
173
174
175
176
177
178
179
180
181
182
183
184
185
186
187
188
189
190
191
192
193
194
195
196
197
198
199
200
201
202
203
204
205
206
207
208
209
// 执行命令
int processCommand(redisClient *c) {
    ......
    // 内存超额
    /* Handle the maxmemory directive.
     *
     * First we try to free some memory if possible (if there are volatile
     * keys in the dataset). If there are not the only thing we can do
     * is returning an error. */
    if (server.maxmemory) {
        int retval = freeMemoryIfNeeded();
        if ((c->cmd->flags & REDIS_CMD_DENYOOM) && retval == REDIS_ERR) {
            flagTransaction(c);
            addReply(c, shared.oomerr);
            return REDIS_OK;
        }
    }
    ......
}
// 如果需要,是否一些内存
int freeMemoryIfNeeded(void) {
    size_t mem_used, mem_tofree, mem_freed;
    int slaves = listLength(server.slaves);
    // redis 从机回复空间和 AOF 内存大小不计算入 redis 内存大小
    /* Remove the size of slaves output buffers and AOF buffer from the
     * count of used memory. */
    mem_used = zmalloc_used_memory();
    // 从机回复空间大小
    if (slaves) {
        listIter li;
        listNode *ln;
        listRewind(server.slaves,&li);
        while((ln = listNext(&li))) {
            redisClient *slave = listNodeValue(ln);
            unsigned long obuf_bytes = getClientOutputBufferMemoryUsage(slave);
            if (obuf_bytes > mem_used)
                mem_used = 0;
            else
                mem_used -= obuf_bytes;
        }
    }
    // server.aof_buf && server.aof_rewrite_buf_blocks
    if (server.aof_state != REDIS_AOF_OFF) {
        mem_used -= sdslen(server.aof_buf);
        mem_used -= aofRewriteBufferSize();
    }
    // 内存是否超过设置大小
    /* Check if we are over the memory limit. */
    if (mem_used <= server.maxmemory) return REDIS_OK;
    // redis 中可以设置内存超额策略
    if (server.maxmemory_policy == REDIS_MAXMEMORY_NO_EVICTION)
        return REDIS_ERR; /* We need to free memory, but policy forbids. */
    /* Compute how much memory we need to free. */
    mem_tofree = mem_used - server.maxmemory;
    mem_freed = 0;
    while (mem_freed < mem_tofree) {
        int j, k, keys_freed = 0;
        // 遍历所有数据集
        for (j = 0; j < server.dbnum; j++) {
            long bestval = 0; /* just to prevent warning */
            sds bestkey = NULL;
            struct dictEntry *de;
            redisDb *db = server.db+j;
            dict *dict;
            // 不同的策略,选择的数据集不一样
            if (server.maxmemory_policy == REDIS_MAXMEMORY_ALLKEYS_LRU ||
                server.maxmemory_policy == REDIS_MAXMEMORY_ALLKEYS_RANDOM)
            {
                dict = server.db[j].dict;
            } else {
                dict = server.db[j].expires;
            }
            // 数据集为空,继续下一个数据集
            if (dictSize(dict) == 0) continue;
            // 随机淘汰随机策略:随机挑选
            /* volatile-random and allkeys-random policy */
            if (server.maxmemory_policy == REDIS_MAXMEMORY_ALLKEYS_RANDOM ||
                server.maxmemory_policy == REDIS_MAXMEMORY_VOLATILE_RANDOM)
            {
                de = dictGetRandomKey(dict);
                bestkey = dictGetKey(de);
            }
            // LRU 策略:挑选最近最少使用的数据
            /* volatile-lru and allkeys-lru policy */
            else if (server.maxmemory_policy == REDIS_MAXMEMORY_ALLKEYS_LRU ||
                server.maxmemory_policy == REDIS_MAXMEMORY_VOLATILE_LRU)
            {
                // server.maxmemory_samples 为随机挑选键值对次数
                // 随机挑选 server.maxmemory_samples个键值对,驱逐最近最少使用的数据
                for (k = 0; k < server.maxmemory_samples; k++) {
                    sds thiskey;
                    long thisval;
                    robj *o;
                    // 随机挑选键值对
                    de = dictGetRandomKey(dict);
                    // 获取键
                    thiskey = dictGetKey(de);
                    /* When policy is volatile-lru we need an additional lookup
                     * to locate the real key, as dict is set to db->expires. */
                    if (server.maxmemory_policy == REDIS_MAXMEMORY_VOLATILE_LRU)
                        de = dictFind(db->dict, thiskey);
                    o = dictGetVal(de);
                    // 计算数据的空闲时间
                    thisval = estimateObjectIdleTime(o);
                    // 当前键值空闲时间更长,则记录
                    /* Higher idle time is better candidate for deletion */
                    if (bestkey == NULL || thisval > bestval) {
                        bestkey = thiskey;
                        bestval = thisval;
                    }
                }
            }
            // TTL 策略:挑选将要过期的数据
            /* volatile-ttl */
            else if (server.maxmemory_policy == REDIS_MAXMEMORY_VOLATILE_TTL) {
                // server.maxmemory_samples 为随机挑选键值对次数
                // 随机挑选 server.maxmemory_samples个键值对,驱逐最快要过期的数据
                for (k = 0; k < server.maxmemory_samples; k++) {
                    sds thiskey;
                    long thisval;
                    de = dictGetRandomKey(dict);
                    thiskey = dictGetKey(de);
                    thisval = (long) dictGetVal(de);
                    /* Expire sooner (minor expire unix timestamp) is better
                     * candidate for deletion */
                    if (bestkey == NULL || thisval < bestval) {
                        bestkey = thiskey;
                        bestval = thisval;
                    }
                }
            }
            // 删除选定的键值对
            /* Finally remove the selected key. */
            if (bestkey) {
                long long delta;
                robj *keyobj = createStringObject(bestkey,sdslen(bestkey));
                // 发布数据更新消息,主要是 AOF 持久化和从机
                propagateExpire(db,keyobj);
                // 注意, propagateExpire() 可能会导致内存的分配, propagateExpire()
提前执行就是因为 redis 只计算 dbDelete() 释放的内存大小。倘若同时计算 dbDelete() 释放的内存
和 propagateExpire() 分配空间的大小,与此同时假设分配空间大于释放空间,就有可能永远退不出这个循环。
                // 下面的代码会同时计算 dbDelete() 释放的内存和 propagateExpire() 分配空间的大小:
                // propagateExpire(db,keyobj);
                // delta = (long long) zmalloc_used_memory();
                // dbDelete(db,keyobj);
                // delta -= (long long) zmalloc_used_memory();
                // mem_freed += delta;
                /////////////////////////////////////////
                /* We compute the amount of memory freed by dbDelete() alone.
                 * It is possible that actually the memory needed to propagate
                 * the DEL in AOF and replication link is greater than the one
                 * we are freeing removing the key, but we can't account for
                 * that otherwise we would never exit the loop.
                 *
                 * AOF and Output buffer memory will be freed eventually so
                 * we only care about memory used by the key space. */
                // 只计算 dbDelete() 释放内存的大小
                delta = (long long) zmalloc_used_memory();
                dbDelete(db,keyobj);
                delta -= (long long) zmalloc_used_memory();
                mem_freed += delta;
                server.stat_evictedkeys++;
                // 将数据的删除通知所有的订阅客户端
                notifyKeyspaceEvent(REDIS_NOTIFY_EVICTED, "evicted",
                    keyobj, db->id);
                decrRefCount(keyobj);
                keys_freed++;
                // 将从机回复空间中的数据及时发送给从机
                /* When the memory to free starts to be big enough, we may
                 * start spending so much time here that is impossible to
                 * deliver data to the slaves fast enough, so we force the
                 * transmission here inside the loop. */
                if (slaves) flushSlavesOutputBuffers();
            }
        }
        // 未能释放空间,且此时 redis 使用的内存大小依旧超额,失败返回
        if (!keys_freed) return REDIS_ERR; /* nothing to free... */
    }
    return REDIS_OK;
}

适用场景

下面看看几种策略的适用场景:

  • allkeys-lru: 如果我们的应用对缓存的访问符合幂律分布(也就是存在相对热点数据),或者我们不太清楚我们应用的缓存访问分布状况,我们可以选择allkeys-lru策略。
  • allkeys-random: 如果我们的应用对于缓存key的访问概率相等,则可以使用这个策略。
  • volatile-ttl: 这种策略使得我们可以向Redis提示哪些key更适合被eviction。

另外,volatile-lru策略和volatile-random策略适合我们将一个Redis实例既应用于缓存和又应用于持久化存储的时候,然而我们也可以通过使用两个Redis实例来达到相同的效果,值得一提的是将key设置过期时间实际上会消耗更多的内存,因此我们建议使用allkeys-lru策略从而更有效率的使用内存。

快乐崇拜的技术博客

ELK 之 nginx日志分析(原创)

发表于 2016-11-29 | 分类于 ELK |

简介

由于公司没有日志收集系统,所以之前搭建了一个ELK日志收集分析系统,如此一来查询日志就方便了很多,再加上ELK的一些方便实用的索引分析功能,可以将数据已图表形式展现,一目了然。

网上好多都是采用了ELK+redis的架构,但考虑到目前公司业务不是很多,所以没有加入redis一层

ELK的安装请参考我上一篇文章 ELK环境搭建

日志收集配置

其实你的ELK系统搭建完成以后,剩下的主要就是logstash收集配置的编写以及整个系统的性能调优了,性能调优后续在写。
这里会逐步说明配置的一些含义,后面会将完整配置贴出。

nginx日志是自定义的格式,所以需要用logstash将message格式化存储到ES中,这里采用grok过滤器,使用match正则表达式解析,根据自己的log_format定制。

  1. nginx日志
  • nginx中log_format的配置
1
2
3
log_format main '$remote_addr | $time_local | $request | $uri | '
'$status | $body_bytes_sent | $bytes_sent | $gzip_ratio | $http_referer | '
'"$http_user_agent" | $http_x_forwarded_for | $upstream_addr | $upstream_response_time | $upstream_status | $request_time';
  • 输出的日志
1
IP地址 | 29/Nov/2016:10:25:16 +0800 | POST /api HTTP/1.1 | /api | 200 | 108 | 326 | - | - | "UGCLehiGphoneClient/2.9.0 Mozilla/5.0 (Linux; Android 5.0.2; X800 Build/BBXCNOP5500710201S) AppleWebKit/537.36 (KHTML, like Gecko) Version/4.0 Chrome/37.0.0.0 Mobile Safari/537.36" | - | IP地址:端口号 | 0.058 | 200 | 0.058
  1. 编写正则表达式

这里可以借助grop官网的debugger和patterns来快速帮助我们写正则表达式

对应上面输出的日志,我写的正则表达式如下

1
%{IPORHOST:clientip} \| %{HTTPDATE:timestamp} \| (?:%{WORD:verb} %{NOTSPACE:request}(?: HTTP/%{NUMBER:http_version})?|-) \| %{URIPATH:uripath} \| %{NUMBER:response} \| (?:%{NUMBER:body_bytes_sent}|-) \| (?:%{NUMBER:bytes_sent}|-) \| (?:%{NOTSPACE:gzip_ratio}|-) \| (?:%{QS:http_referer}|-) \| %{QS:agent} \| (?:%{QS:http_x_forwarded_for}|-) \| (%{URIHOST:upstream_addr}|-) \| (%{BASE16FLOAT:upstream_response_time}) \| %{NUMBER:upstream_status} \| (%{BASE16FLOAT:request_time})

在grop官网的debugger解析结果如下

1
2
3
4
5
6
7
8
9
10
11
12
13
14
15
16
17
18
19
20
21
22
23
24
25
26
27
28
29
30
31
32
33
34
35
36
37
38
39
40
41
42
43
44
45
46
47
48
49
50
51
52
53
54
55
56
57
58
59
60
61
62
63
64
65
66
67
68
69
70
71
72
73
74
75
76
77
78
79
80
81
82
83
84
85
86
87
88
89
90
91
92
93
94
95
96
97
98
99
100
101
102
103
104
105
106
107
108
109
110
111
112
113
114
115
116
117
118
119
120
121
122
123
124
125
126
127
128
129
130
131
132
133
134
135
136
137
138
139
140
141
142
143
144
145
146
147
148
149
150
151
152
153
154
155
156
157
158
159
160
161
162
163
164
165
166
167
168
169
170
171
172
173
174
175
176
177
{
"clientip": [
[
"10.73.134.29"
]
],
"HOSTNAME": [
[
"10.73.134.29",
"117.121.58.159"
]
],
"IP": [
[
null,
null
]
],
"IPV6": [
[
null,
null
]
],
"IPV4": [
[
null,
null
]
],
"timestamp": [
[
"28/Nov/2016:16:13:07 +0800"
]
],
"MONTHDAY": [
[
"28"
]
],
"MONTH": [
[
"Nov"
]
],
"YEAR": [
[
"2016"
]
],
"TIME": [
[
"16:13:07"
]
],
"HOUR": [
[
"16"
]
],
"MINUTE": [
[
"13"
]
],
"SECOND": [
[
"07"
]
],
"INT": [
[
"+0800"
]
],
"verb": [
[
"POST"
]
],
"request": [
[
"/inner"
]
],
"http_version": [
[
"1.1"
]
],
"BASE10NUM": [
[
"1.1",
"200",
"243",
"461",
"200"
]
],
"uripath": [
[
"/inner"
]
],
"response": [
[
"200"
]
],
"body_bytes_sent": [
[
"243"
]
],
"bytes_sent": [
[
"461"
]
],
"gzip_ratio": [
[
"-"
]
],
"http_referer": [
[
null
]
],
"QUOTEDSTRING": [
[
null,
""-"",
null
]
],
"agent": [
[
""-""
]
],
"http_x_forwarded_for": [
[
null
]
],
"upstream_addr": [
[
"117.121.58.159:8001"
]
],
"IPORHOST": [
[
"117.121.58.159"
]
],
"port": [
[
"8001"
]
],
"upstream_response_time": [
[
"0.046"
]
],
"upstream_status": [
[
"200"
]
],
"request_time": [
[
"0.046"
]
]
}
  1. 地理坐标分析-geoip
  • 安装geoip数据库
1
2
3
cd 你的logstash地址/logstash/etc
curl -O "http://geolite.maxmind.com/download/geoip/database/GeoLiteCity.dat.gz"
gunzip GeoLiteCity.dat.gz
  • 配置logstash使用GeoIP

只需要在filter里配置即可

1
2
3
4
5
6
#地理坐标分析
geoip {
source => "clientip"
##这里指定好解压后GeoIP数据库文件的位置
database => "替换为你的文件路径/logstash-2.4.1/etc/GeoLiteCity.dat"
}
  • GeoIP使用注意事项

如果你出现下面的错误

报错No Compatible Fields: The “[nginx-access-]YYYY-MM” index pattern does not contain any of the following field types: geo_point

原因:索引格式为[nginx-access-]YYYY-MM的日志文件由logstash输出到Elasticsearch;在 elasticsearch 中,所有的数据都有一个类型,什么样的类型,就可以在其上做一些对应类型的特殊操作。geo信息中的location字段是经纬度,我们需要使用经纬度来定位地理位置;在 elasticsearch 中,对于经纬度来说,要想使用 elasticsearch 提供的地理位置查询相关的功能,就需要构造一个结构,并且将其类型属性设置为geo_point,此错误明显是由于我们的geo的location字段类型不是geo_point。

解决方法:Elasticsearch 支持给索引预定义设置和 mapping(前提是你用的 elasticsearch 版本支持这个 API,不过估计应该都支持)。其实ES中已经有一个默认预定义的模板,我们只要使用预定的模板即可,我们在ES中看下模板。简而言之就是output的index名称,必须以logstash-开头

1
2
3
4
5
6
7
8
9
output {
if [type] == "nginx_lehi_access" { #nginx-access
elasticsearch {
action => "index" #The operation on ES
hosts => [替换为你的ES服务器列表,字符串数组格式] #ElasticSearch host, can be array.
index => "logstash-nginx_lehi_access" #The index to write data to.
}
}
}

logstash完整配置文件

1
2
3
4
5
6
7
8
9
10
11
12
13
14
15
16
17
18
19
20
21
22
23
24
25
26
27
28
29
30
31
32
33
34
35
36
37
38
39
40
41
42
43
44
45
46
47
48
49
50
51
52
53
54
55
56
57
input {
file {
type => "nginx_lehi_access"
#监听文件的路径
path => "替换为你的日志文件路径/access.log"
}
}
filter {
if [type] == "nginx_lehi_access" {
#定义数据的格式
grok {
match => [
"message", "%{IPORHOST:clientip} \| %{HTTPDATE:timestamp} \| (?:%{WORD:verb} %{NOTSPACE:request}(?: HTTP/%{NUMBER:http_version})?|-) \| %{URIPATH:uripath} \| %{NUMBER:response} \| (?:%{NUMBER:body_bytes_sent}|-) \| (?:%{NUMBER:bytes_sent}|-) \| (?:%{NOTSPACE:gzip_ratio}|-) \| (?:%{QS:http_referer}|-) \| %{QS:user_agent} \| (?:%{QS:http_x_forwarded_for}|-) \| (%{URIHOST:upstream_addr}|-) \| (%{BASE16FLOAT:upstream_response_time}) \| %{NUMBER:upstream_status} \| (%{BASE16FLOAT:request_time})"
]
}
#定义时间戳的格式
date {
match => [ "timestamp" , "dd/MMM/YYYY:HH:mm:ss Z" ]
}
#地理坐标分析
geoip {
source => "clientip"
##这里指定好解压后GeoIP数据库文件的位置
database => "替换为你的文件路径/logstash-2.4.1/etc/GeoLiteCity.dat"
}
#同样地还有客户端的UA,由于UA的格式比较多,logstash也会自动去分析,提取操作系统等相关信息
#定义客户端设备是哪一个字段
useragent {
source => "user_agent"
target => "userAgent"
}
#把所有字段进行urldecode(显示中文)
urldecode {
all_fields => true
}
#需要进行转换的字段,这里是将访问的时间转成int,再传给Elasticsearch。注:似乎没有double,只有float,这里我没有深入研究,总之写double不对。
mutate {
gsub => ["user_agent","[\"]",""] #将user_agent中的 " 换成空
convert => [ "response","integer" ]
convert => [ "body_bytes_sent","integer" ]
convert => [ "bytes_sent","integer" ]
convert => [ "upstream_response_time","float" ]
convert => [ "upstream_status","integer" ]
convert => [ "request_time","float" ]
convert => [ "port","integer" ]
}
}
}
output {
if [type] == "nginx_lehi_access" { #nginx-access
elasticsearch {
action => "index" #The operation on ES
hosts => [替换为你的ES服务器列表,字符串数组格式] #ElasticSearch host, can be array.
index => "logstash-nginx_lehi_access" #The index to write data to.
}
}
}

ES数据查看

到此,就可以在ES中查看具体解析出来的数据是什么样子的了

进入http://你的IP:PORT/_plugin/head/,点击数据浏览,找到你的nginx索引,选一条点击查看生成的索引原始数据:

1
2
3
4
5
6
7
8
9
10
11
12
13
14
15
16
17
18
19
20
21
22
23
24
25
26
27
28
29
30
31
32
33
34
35
36
37
38
39
40
41
42
43
44
45
46
47
48
49
50
51
52
53
54
55
56
{
"_index": "logstash-nginx_lehi_access",
"_type": "nginx_lehi_access",
"_id": "AViqy6DEzXT_yrqr__Ka",
"_version": 1,
"_score": 1,
"_source": {
"message": "116.226.72.255 | 28/Nov/2016:19:57:00 +0800 | POST /api HTTP/1.1 | /api | 200 | 1314 | 1533 | - | - | "Dalvik/2.1.0(Linux;U;Android6.0;LetvX501Build/DBXCNOP5801810092S)" | - | 117.121.58.159:8001 | 0.023 | 200 | 0.023",
"@version": "1",
"@timestamp": "2016-11-28T11:57:00.000Z",
"path": "/letv/logs/nginx/lehi/access.log",
"host": "vm-29-19-pro01-bgp.bj-cn.vpc.letv.cn",
"type": "nginx_lehi_access",
"clientip": "116.226.72.255",
"timestamp": "28/Nov/2016:19:57:00 +0800",
"verb": "POST",
"request": "/api",
"http_version": "1.1",
"uripath": "/api",
"response": 200,
"body_bytes_sent": 1314,
"bytes_sent": 1533,
"gzip_ratio": "-",
"user_agent": "Dalvik/2.1.0 (Linux; U; Android 6.0; Letv X501 Build/DBXCNOP5801810092S)",
"upstream_addr": "117.121.58.159:8001",
"port": 8001,
"upstream_response_time": 0.023,
"upstream_status": 200,
"request_time": 0.023,
"geoip": {
"ip": "116.226.72.255",
"country_code2": "CN",
"country_code3": "CHN",
"country_name": "China",
"continent_code": "AS",
"region_name": "23",
"city_name": "Shanghai",
"latitude": 31.045600000000007,
"longitude": 121.3997,
"timezone": "Asia/Shanghai",
"real_region_name": "Shanghai",
"location": [121.3997,
31.045600000000007]
},
"userAgent": {
"name": "Android",
"os": "Android 6.0",
"os_name": "Android",
"os_major": "6",
"os_minor": "0",
"device": "Letv X501",
"major": "6",
"minor": "0"
}
}
}

kibana图表生成分析

这里请参考logstash日志分析的配置和使用(设计模板)

注意事项

  1. logstash在启动时报错:默认是4个线程,但是只能创建一个线程。

这是同一个log4j_to_es.conf配置了多个input-file并且配置了multiline后出现的问题,应该把multiline配置从filter中移动到input中去:

1
2
3
4
5
6
7
8
9
10
file {
type => "whatsliveapi"
#监听文件的路径
path => "/letv/logs/apps/api/whatslive/api_8001.log"
codec => multiline {
pattern => "^\d{4}-\d{1,2}-\d{1,2}\s\d{1,2}:\d{1,2}:\d{1,2}"
negate => true
what => "previous"
}
}
  1. 在kibana中无法选择geoip以及userAgent的字段

解决办法:进入kibana-settings-indices,点击你的索引,然后点击刷新按钮即可

参考资料

  • logstash日志分析的配置和使用(设计模板)
  • Kibana的图形化——Tile Map
  • 使用elk+redis搭建nginx日志分析平台
  • LOGSTASH+ELASTICSEARCH+KIBANA处理NGINX访问日志
  • ogstash使用grok过滤nginx日志(二)
快乐崇拜的技术博客

ELK环境搭建(原创)

发表于 2016-11-24 | 分类于 ELK |

基本环境

Linux系统

  • elasticsearch-2.4.2.tar.gz
  • logstash-2.4.1.tar.gz
  • kibana-4.6.3-linux-x86_64.tar.gz

基本概念

本节内容摘自http://baidu.blog.51cto.com/71938/1676798

  日志主要包括系统日志、应用程序日志和安全日志。系统运维和开发人员可以通过日志了解服务器软硬件信息、检查配置过程中的错误及错误发生的原因。经常分析日志可以了解服务器的负荷,性能安全性,从而及时采取措施纠正错误。
  通常,日志被分散的储存不同的设备上。如果你管理数十上百台服务器,你还在使用依次登录每台机器的传统方法查阅日志。这样是不是感觉很繁琐和    效率低下。当务之急我们使用集中化的日志管理,例如:开源的syslog,将所有服务器上的日志收集汇总。
集中化管理日志后,日志的统计和检索又成为一件比较麻烦的事情,一般我们使用grep、awk和wc等Linux命令能实现检索和统计,但是对于要求更高的查询、排序和统计等要求和庞大的机器数量依然使用这样的方法难免有点力不从心。
开源实时日志分析ELK平台能够完美的解决我们上述的问题,ELK由ElasticSearch、Logstash和Kiabana三个开源工具组成。官方网站:https://www.elastic.co/products
  • Elasticsearch是个开源分布式搜索引擎,它的特点有:分布式,零配置,自动发现,索引自动分片,索引副本机制,restful风格接口,多数据源,自动搜索负载等。
  • Logstash是一个完全开源的工具,他可以对你的日志进行收集、分析,并将其存储供以后使用(如,搜索)。
  • kibana 也是一个开源和免费的工具,他Kibana可以为 Logstash 和 ElasticSearch 提供的日志分析友好的 Web 界面,可以帮助您汇总、 分析和搜索重要数据日志。

工作原理如下如所示:

在需要收集日志的所有服务上部署logstash,作为logstash agent(logstash shipper)用于监控并过滤收集日志,将过滤后的内容发送到logstash indexer,logstash indexer将日志收集在一起交给全文搜索服务ElasticSearch,可以用ElasticSearch进行自定义搜索通过Kibana 来结合自定义搜索进行页面展示。

elasticsearch集群安装

下载地址

https://www.elastic.co/products/elasticsearch

解压

1
2
3
tar -zxvf elasticsearch-2.4.2.tar.gz
mv elasticsearch-2.4.2 elasticsearch-2.4.2_1
cd elasticsearch-2.4.2_1/config

安装head插件

1
./bin/plugin install mobz/elasticsearch-head

配置config

这里集群包含3台服务器

elasticsearch-2.4.2_1的配置

1
2
3
4
5
6
7
8
9
10
11
cluster.name: es-cluster
node.name: node-1
network.host: 你的服务器ip地址
http.port: 9211
transport.tcp.port: 9311
#过期时间
index.cache.field.expire: 1d
#默认类型为resident, 字面意思是常驻(居民), 一直增加,直到内存 耗尽。 改为soft就是当内存不足的时候,先clear掉 占用的,然后再 往内存中放。设置为soft后,相当于设置成了相对的内存大小。resident的话,除非内存够大。
index.cache.field.type: soft
#可能是因为我使用的服务器已经有了一个elasticsearch集群的原因,这里不写集群地址,集群启动后无法建立,原因待查
discovery.zen.ping.unicast.hosts: ["你的服务器列表(TCP端口哦)", "你的服务器列表(TCP端口哦)","你的服务器列表(TCP端口哦)"]

elasticsearch-2.4.2_21的配置(只写了不同的部分)

1
2
3
node.name: node-2
http.port: 9212
transport.tcp.port: 9312

elasticsearch-2.4.2_3的配置(只写了不同的部分)

1
2
3
node.name: node-3
http.port: 9213
transport.tcp.port: 9313

后台启动3台服务器:

1
./bin/elasticsearch &

注意要讲elasticsearch所有文件用户赋给elasticsearch用户,否则没权限。
这是出于系统安全考虑设置的条件。由于ElasticSearch可以接收用户输入的脚本并且执行,为了系统安全考虑。
chown -R elasticsearch elasticsearch2.4.0

如果出现curl 127.0.0.1:9211可以正常访问,curl 本机IP地址:9211不能访问的问题,则需要在conf文件中配置network.host: 你的服务器ip地址。参考:ss -l命令

安装logstash

修改配置文件

  1. 读取文件方式
    1
    2
    3
    4
    5
    6
    7
    8
    9
    10
    11
    12
    13
    14
    15
    16
    17
    18
    19
    20
    21
    22
    23
    24
    25
    26
    27
    28
    29
    30
    31
    32
    33
    34
    35
    input {
    file {
    type => "infolog"
    #监听文件的路径
    path => "你的日志路径*.log"
    }
    file {
    type => "errorlog"
    #监听文件的路径
    path => "你的日志路径*.log"
    }
    }
    filter {
    multiline {
    pattern => "^\d{4}-\d{1,2}-\d{1,2}\s\d{1,2}:\d{1,2}:\d{1,2}"
    negate => true
    what => "previous"
    }
    }
    output {
    if [type] == "infolog" {
    elasticsearch {
    action => "index" #The operation on ES
    hosts => ["elasticsearch的IP地址:9211", "elasticsearch的IP地址:9212","elasticsearch的IP地址:9213"] #ElasticSearch host, can be array.
    index => "apilog" #The index to write data to.
    }
    }else{
    elasticsearch {
    action => "index" #The operation on ES
    hosts => ["elasticsearch的IP地址:9211", "elasticsearch的IP地址:9212","elasticsearch的IP地址:9213"] #ElasticSearch host, can be array.
    index => "apierrorlog" #The index to write data to.
    }
    }
    }
  • 说明:multiline的作用是为了处理错误日志的,使得错误堆栈信息作为一条记录显示。这里可能导致无法创建多线程,只能以单线程运行,解决办法参考我的另一篇文章ELK 之 nginx日志分析
    1
    2
    3
    4
    5
    6
    7
    filter {
    multiline {
    pattern => "^\d{4}-\d{1,2}-\d{1,2}\s\d{1,2}:\d{1,2}:\d{1,2}"
    negate => true
    what => "previous"
    }
    }
  1. 还可以直接与log4j配合使用,直接将日志输出到logstash中
    1
    2
    3
    4
    5
    6
    7
    8
    9
    log4j.logger.包名=debug, socket
    # appender socket
    log4j.appender.socket=org.apache.log4j.net.SocketAppender
    log4j.appender.socket.Port=${elk_port}
    log4j.appender.socket.RemoteHost=${elk_ip}
    log4j.appender.socket.layout=org.apache.log4j.PatternLayout
    log4j.appender.socket.layout.ConversionPattern=%d [%-5p] [%l] %m%n
    log4j.appender.socket.ReconnectionDelay=10000

启动服务

1
./bin/logstash agent -f config/log4j_to_es.conf &

安装kibana

修改配置

1
2
3
4
server.port: 5601
server.host: "你的IP地址"
elasticsearch.url: "http://你的IP地址:9211"
kibana.index: ".kibana"

后台启动

1
nohup bin/kibana &

但是nohup在使用时还需要注意一些问题:
1、当输入nohup COMMAND & 命令后,需要按任意键返回到shell窗口
2、退出当前登录窗口用exit命令,不要直接点击窗口上的叉来关闭

配置索引

进入kibana,配置好在logstash中配置的索引


到此为止,ELK环境搭建完毕。
后续会继续写ELK的具体使用教程,敬请期待

参考资料

  • ELK(ElasticSearch, Logstash, Kibana)搭建实时日志分析平台
  • Elasticsearch部分节点不能发现集群(脑裂)问题处理
  • ElasticSearch集群服务器配置
  • ElasticSearch教程(三)————ElasticSearch集群搭建
  • 源实时日志分析ELK平台部署
  • logstash日志分析的配置和使用
12
liubenlong

liubenlong

聪明出于勤奋,天才在于积累

13 日志
7 分类
15 标签
RSS
© 2015 - 2016 liubenlong
由 Hexo 强力驱动
主题 - NexT.Pisces